
New Year is really close now and here at Tripwire Magazine we decided to prepare a little treat for you to help you create you own unique greeting cards. So we decided to offer a New Year's Greeting Card Cover Design and detailed tutorial made in Adobe Illustrator. We are also giving away a free vector along with the tutorial on how to make this Season's Greetings card. We hope you will enjoy this tutorial and be useful for you this coming year. Please drop a comment if you have any feedback for us and share this post with your friends and colleagues!
Advertisement
Florene Landscapes - Nature Draws Circles - Light Switch Covers - double toggle switch
Learn more
- Let's create a black background using Rectangle Tool. Under Object Menu, choose "Create Gradient Mesh" and set 4 and 6 for rows and column fields respectively. Choose Flat option for Appearance. Using the Direct Selection Tool, let's drag the points lower than its original position as shown in the illustration below.
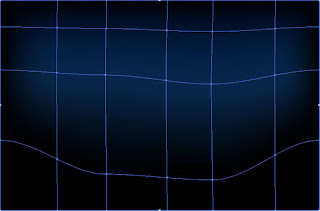
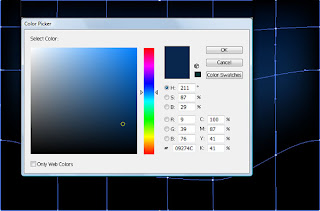
- Select all the points lined in the middle of our grid. Hit Shift Key while doing so. Fill it with #09274C color.
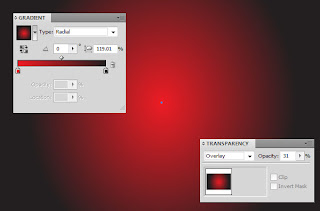
- Create a new background on top of our first background using Rectangle Tool. Fill it with "Radial" Gradient (R=237 G=28 B=36 and R=0 G=0 B=0) and "Overlay" under the Transparency window, set with 31% Opacity.
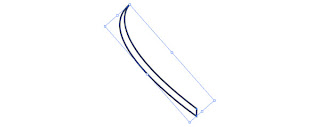
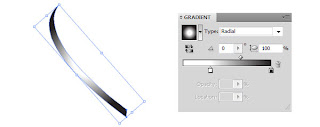
- Grab the Pen Tool and draw an arc shape as shown in the illustration below.
- Fill it with Radial Gradient with white and black background on both sides. Slightly move the white slider on the right.
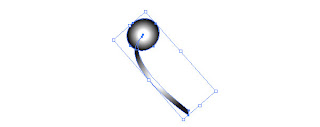
- Draw a circle using the Ellipse Tool at the top of our drawn arc. Apply "Radial" Gradient. Group the circle and arc together.
- Make several copies and arrange it as shown in the illustration below by rotating each individual group.
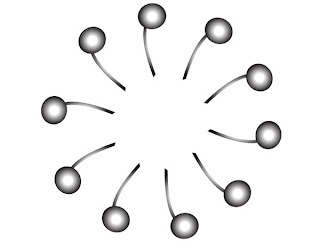
- Draw a big circle in the middle. Group them all together.
 Let's now drag it to our gradient mesh background. Set the transparency "Color Dodge".
 Now for the "fun part". We will start creating our own brush. Draw again another small circle using the Ellipse Tool. Drag it in the "brush" panel (Shortcut key is "F5"). A "New Brush" pop-up will appear, choose the "scatter brush" from the options given. Click Ok.
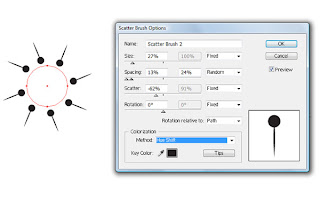
 Choose the Ellipse tool and draw a circle around our first drawing.
 Double click on our newly created brush. A "Scatter Brush Options" dialogue box will appear. Choose "Path" from the "Rotation Relative to:" options. Choose Random for "Size, Spacing, and Scatter" as well. Move the slider from the bar of each option to customize the size, spacing and distance between our circle brushes. Tick on the Preview checkbox to see what our customization would look like. Click OK when done, then Apply to Stokes.
 Go to Object, and "Expand Appearance". Apply "Radial" Gradient and Color Dodge in the transparency window.
 Select our first group and the circle brush. Group them together.
 Again, we will create a new brush. Grab the Pen Tool and start drawing a shape similar to the below illustration.
 Add a circle at the top. Unite (using the Pathfinder) the two created shape.
 Drag it in the "brush" panel (Shortcut key is "F5"). A "New Brush" pop-up will appear, choose the "scatter brush" from the options given.
 Create a new circle using the ellipse tool. Double click on our newly created brush. A "Scatter Brush Options" dialogue box will appear again. Choose "Path" from the "Rotation Relative to:" option. Choose Random for "Size, Spacing, and Scatter" as well. Move the slider from those choices to customize the size, spacing and distance between our circle brushes. Tick on the Preview checkbox to see what our customization would look like. Click OK when done, then Apply to Stokes. Go to Object, Expand Appearance. Apply Radial Gradient and Color Dodge.
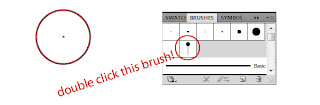
 Drag it to our gradient mesh background in the center of our fireworks. Resize.
 Add more light and sparkles by copying our previous design. Paste, resize and rotate to give desirable results.
 This should finish our fireworks blast. Let us now create our firework's tail. Start by using the Pen Tool.
Draw a wavy vertical line Double click again our custom circle brush and play with the options value. I set my size 10% to make the circles smaller. Drag it below our fireworks. Go to Object, Expand Appearance. Apply Radial Gradient and Color Dodge.
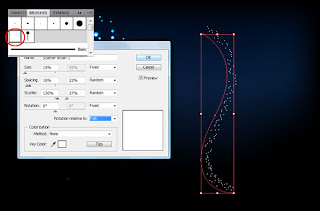
 Repeat the same step to give us a starry sky effect. Just remember to repeat our scatter brush effects, radial gradient and color dodge to give us that starry night spark.
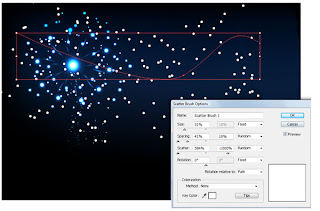
 You can also add more fireworks to complete our New Year Fireworks night. Add a season's greetings text to complete our greeting card.
 Again, we would like to greet you a Happy and Prosperous New Year!
Download Vector Here => Free Season's Greetings Design Vector

Author : Melanie Reyes
Melanie Reyes is an aspiring graphic designer who loves to learn new stuff. She is currently learning adobe illustrator, offering her finished vector work free for the public to download. Melanie runs designermelanie.com, a site dedicated to free vector downloads, tutorials and of course, her online portfolio.
These are our most popular posts: how to draw double circles
Create a Vector Light Bulb Icon with Inkscape - IDGrafis
Make the intersections by double-clicking above the two yellow diamonds on the border of the circle. Two new nodes should appear where you double-clicked. Select the square node at the very bottom of the circle and press ... read moreFigure Eights
I was writing out some notes and a double circle eight slipped out. It just popped out like it had been waiting all those years to make an appearance. I looked at it and remembered all the reasons I had loved my two circle ... read moreHow To Create A Print Ready Festive Postcard In Adobe photoshop ...
For the Christmas Ball, select the Ellipse Tool and draw a circle while holding down the Shift Key. Double click on the circle layer to go into Blending Options and put in the options below: Front How To Create A Print Ready ... read moreHow to Design an Inset Button in Photoshop - Paper Leaf Design ...
Next, draw a circle in the center of page using the Ellipse Tool. Now, this first circle is not the initial button shape, so dont draw it too small. Like so ... Double-click the shape layer that is visible in the Layers Palette to do that. read more


0 件のコメント:
コメントを投稿
登録 コメントの投稿 [Atom]
<< ホーム